
Showing posts with label Cricut Explore. Show all posts
Showing posts with label Cricut Explore. Show all posts
Sunday, March 12, 2017
Cricut St. Patrick's Day Spinner Card
Hello Crafters! I have been wanting to make a spinner card for some time and finally was up for the challenge. I am sorry I am getting this up later than I would like but the tutorials were long and took some time to upload. If you have any questions, please, leave a comment or e-mail me. All the images are available in Cricut Design Space Access. Here is the cut file from Cricut Design Space: https://us.cricut.com/design/#/canvas/54935685


Friday, February 3, 2017
Wild About You Valentine Card featuring Miss. Kate Cutables
Hello, all! I am excited to share a Valentine's Day card with you. And it is my pleasure to be guest designing for Miss. Kate Cuttables. When I found that I would be creating this card for the month of February I knew exactly what I wanted to create. This card features the following cut files from Miss. Kate Cuttables: Zoo Fun Bundle, Wild About You title, and Nested Hearts.
I include all the measurements for this cute little critter peek-a-boo card. I included a process video (at the end of this post) which shows how I assembled my card. If you would like to see a tutorial on how to create a peek-a-boo card in Cricut Design Space leave a comment. I hope you enjoy!


This card measures 5" x 7" and I used a kraft cardstock for my card base. It is a larger card but I think a child would love this cute critter card.

I used my Cricut Explore for all the die cutting and Cricut Design Space to create the design. These files include a JPEG, PNG, and SVG so that it can be used with most electronic die cutting machines. I created a single panel (left) from kraft cardstock; I find this makes creating dimensional cards easier to assemble. The pink card is my main panel where my little critters come to life. I lined up a heart from the Nested Heart file which created this peek-a-boo frame.


These are the hearts that I created from the Nested Heart file. They are the same size as the heart cut outs on the main panel. I used embossing folders to add texture. It is amazing what a difference this made. These hearts measure 2.19" x 1.95". Using my main pink panel as a template I adhered the hearts to the kraft panel; I show this process in the video.

I wanted to add a layered accent panel for the front of my card. I used the Straight and Slim font in Cricut Design Space to write 'Valentine'. I offset the cream cardstock to the right (when layering; see above photo) to create interest.


For my sentiment I used the Wild About You title. I love all the layers with this sentiment. I used my Xyron Create-A-Stick to adhere the words to the shadow. The title measures 2.4" x 2.3". And it includes some fun tropical leaves.

I just smile when I look at these little critters which are from the Zoo Fun Bundle. I used the PNG file that is included in the bundle and the Print then Cut feature in Cricut Design Space to create my critters. I used Glossy Accents on the eyes and nose to bring them to life.
Here is the process video or watch on YouTube:
I include all the measurements for this cute little critter peek-a-boo card. I included a process video (at the end of this post) which shows how I assembled my card. If you would like to see a tutorial on how to create a peek-a-boo card in Cricut Design Space leave a comment. I hope you enjoy!


This card measures 5" x 7" and I used a kraft cardstock for my card base. It is a larger card but I think a child would love this cute critter card.

I used my Cricut Explore for all the die cutting and Cricut Design Space to create the design. These files include a JPEG, PNG, and SVG so that it can be used with most electronic die cutting machines. I created a single panel (left) from kraft cardstock; I find this makes creating dimensional cards easier to assemble. The pink card is my main panel where my little critters come to life. I lined up a heart from the Nested Heart file which created this peek-a-boo frame.


These are the hearts that I created from the Nested Heart file. They are the same size as the heart cut outs on the main panel. I used embossing folders to add texture. It is amazing what a difference this made. These hearts measure 2.19" x 1.95". Using my main pink panel as a template I adhered the hearts to the kraft panel; I show this process in the video.

I wanted to add a layered accent panel for the front of my card. I used the Straight and Slim font in Cricut Design Space to write 'Valentine'. I offset the cream cardstock to the right (when layering; see above photo) to create interest.


For my sentiment I used the Wild About You title. I love all the layers with this sentiment. I used my Xyron Create-A-Stick to adhere the words to the shadow. The title measures 2.4" x 2.3". And it includes some fun tropical leaves.

I just smile when I look at these little critters which are from the Zoo Fun Bundle. I used the PNG file that is included in the bundle and the Print then Cut feature in Cricut Design Space to create my critters. I used Glossy Accents on the eyes and nose to bring them to life.
Here is the process video or watch on YouTube:
It was my please to create this card for Miss. Kate Cuttables; be sure to visit her store for awesome cut files.
Happy Crafting,
Kimberly
Sunday, May 29, 2016
Cricut Bump in the Night Birthday Card
Hello Crafters!
I wanted to share a boys birthday card that I created with Cricut Design Space. The main characters come for the Cricut cartridge 'Bump in the Night'. All images are included in the Cricut Access Subscription. The Cricut Design Space cut file and video tutorial link are available at the end of this post.


I wanted to share a boys birthday card that I created with Cricut Design Space. The main characters come for the Cricut cartridge 'Bump in the Night'. All images are included in the Cricut Access Subscription. The Cricut Design Space cut file and video tutorial link are available at the end of this post.

I used the Print then Cut feature in Design Space for my monsters and the Raaaarh sentiment. To give these images depth I used Glossy Accents on the monster faces and the sentiment. I also painted the cut edges with a brush pen, such as Tim Holtz Distress Markers, in a coordinating color. It really gives the images a finished look.

I let my Cricut Explore do the writing for me, as you can see with the inside sentiment. The dot patterned paper is from Simple Stories 'Snap Color Vibe'; I am in love with this little 6 x 6 packet. The color theme for my card is Mustard Yellow, Dark Orange, and Peacock Teal.
Thank you for stopping by today. Please, let me know if you have any questions. The video tutorial will show how to assemble this card; I would appreciate if you would like my video and become a YouTube subscriber.
Also, I made this card for Die Cuttin' Diva's challenge blog - the theme is Polka Dots. Head over and try their challenges; I find them very inspiring. Click HERE to be taken directly to their blog.
Click HERE for the Cricut Design Space cut file.
Click HERE for the YouTube video tutorial or Watch Below.
Wednesday, May 18, 2016
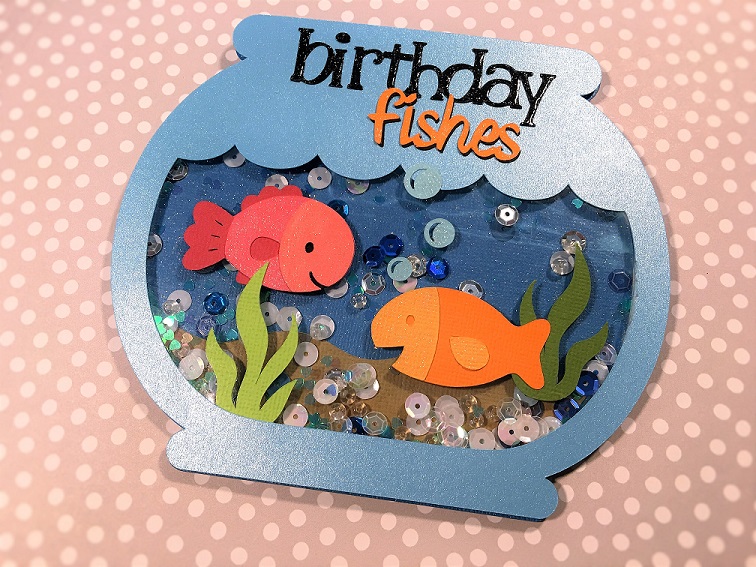
Fishbowl Shaker Card Video Tutorial
Hello Crafters! I finally completed editing and uploading the video tutorial for my Fishbowl Shaker Card.


Watch Part 1 Below or on YouTube
Please, leave a comment or share a photo of your project on my FaceBook Page - click Here. For the Cricut Design Space cut file - click Here. Just an FYI...if you do not own the cartridge A Child's Year you will need to delete Birthday. You can easily create your own or use one you own. If you need help let me know.

Watch Part 1 Below or on YouTube
Watch Part 2 Below or on YouTube
Please, leave a comment or share a photo of your project on my FaceBook Page - click Here. For the Cricut Design Space cut file - click Here. Just an FYI...if you do not own the cartridge A Child's Year you will need to delete Birthday. You can easily create your own or use one you own. If you need help let me know.
Be sure to become a Follower of this blog and sign up for e-mails so that you can be notified when I share projects and cut files. Thanks for stopping by.
Happy Crafting! Kim
Happy Crafting! Kim
Monday, May 9, 2016
Sunshine & Laughter Card
Hello Crafters!
I wanted to share a quick and happy card with you today that I created with my Cricut Explore.

I wanted to share a quick and happy card with you today that I created with my Cricut Explore.

Friday, April 29, 2016
Miss Kate Cuttables Guest Designer Project
Hello Crafters,
This is Kim with The Electric Poppy. I am thrilled to share a project that I created as a Miss Kate Cuttables Guest Designer. When I was offered this opportunity it felt like Christmas. I love Miss Kate Cuttables cut files. I created a shaker card using 3 different cut files: Princess Jewels, Tags, Borders and Corners Set, and Card Phrases. I used the cut files to create my card in Cricut Design Space and they cut out beautifully with my Cricut Explore.

This is Kim with The Electric Poppy. I am thrilled to share a project that I created as a Miss Kate Cuttables Guest Designer. When I was offered this opportunity it felt like Christmas. I love Miss Kate Cuttables cut files. I created a shaker card using 3 different cut files: Princess Jewels, Tags, Borders and Corners Set, and Card Phrases. I used the cut files to create my card in Cricut Design Space and they cut out beautifully with my Cricut Explore.

Monday, March 21, 2016
Cricut Circle Card - Cup of Tea
Hi Everyone! I know it has been forever since I have posted anything...I sure have missed you all! Here is a circle card I created in Cricut Design Space. I used the Print then Cut feature in this card. I think this would be a sweet Thank You or Thinking of You card.


Monday, January 4, 2016
2016: Ready to Get Started
I hope everyone had a wonderful holiday. I am ready to get back to crafting. Here is a sneak peak of my upcoming winter card. I will be making a video tutorial on how to assemble this cute card...so stay tuned and share with a friend. I have a lot to share with you in this new year. Here is a link to my YouTube channel: https://www.youtube.com/channel/UCngF9lrEBPNbcedErvNxuiQ/featured Happy Crafting!

Sunday, November 22, 2015
Thanksgiving Box Card
Hi Crafters! I hope all is well in your world. I can't believe Thanksgiving is fast approaching. I had created this box card in Cricut Design Space and had planned on sharing it earlier this month. I created this little box card using items that are available in the Cricut Design Space Subscription. I also made a video tutorial on how to assemble this card; link for the video and the Design Space file will be at the end of this post. I would love to see a picture if you should recreate this card; you can share on my Facebook page.


Sunday, November 8, 2015
Craft Haul Video and Giveaway
Hello Crafters! I wanted to share a haul via YouTube video. I purchased crafty goodies from Michaels, Concord and 9th, and Close to My Heart. I mention in the video that if you purchase any Cricut Bundle from my Close to My Heart Store a winner will be chosen to receive the Twinkle Stamp set. In the video I explain why I chose to get the Cricut Artistry Bundle. I did purchase the digital version....great value!
Now to make it even better for my blog subscribers. If you purchase any Cricut Bundle from my Close to My Heart Store a winner will be chosen...if the winner is a blog subscriber you will receive 2 stamp sets...Twinkle and Framed. Framed coordinates with the new Artistry cartridge and Twinkle coordinates with Artiste. Both will be fabulous on their own! These stamp sets are no longer available because they were recent Stamps of the Month. Here are some pictures:
Now to make it even better for my blog subscribers. If you purchase any Cricut Bundle from my Close to My Heart Store a winner will be chosen...if the winner is a blog subscriber you will receive 2 stamp sets...Twinkle and Framed. Framed coordinates with the new Artistry cartridge and Twinkle coordinates with Artiste. Both will be fabulous on their own! These stamp sets are no longer available because they were recent Stamps of the Month. Here are some pictures:
 |
| Twinkle Stamp Set |
 |
| Framed Stamp Set |
Sunday, October 25, 2015
Hocus Pocus Card ~ Halloween Card Series #2
I wanted to share the second card in my 2015 Halloween Card Series. She is a glittery witch brewing up some Hocus Pocus. I created this card in Cricut Design Space and used my Cricut Explore to cut out all the elements; except for the card base. The card base is a standard A2 portrait card. All images are included in the Cricut Design Space subscription. I will be giving a card kit that includes all the cut pieces and bling featured in this card. Details and Cricut Design Space link for cut file at end of post. There is also a YouTube video tutorial to help you recreate this card...

Sunday, October 4, 2015
Spooky Ghost Box Card - Halloween Card Series 1
Hey Everyone! I completed my first card for my Halloween card series. The first is a box card and I created a video tutorial as well. The video is in 2 parts because I didn't want to leave any details out. The card measures 3" x 7" when completed and will fit in a 6" x 8" envelope. All images are available in the Cricut Design Space Subscription. Most images are from the Creepy Critter cartridge...a favorite of mine!
I will also be giving away 1 card kit for each of my Halloween cards. The kit includes all the paper die cuts to construct the card. All you need to do is leave a comment with your email address and be a subscriber to my blog and YouTube channel...that is it. Winner will be announced Saturday October 10, 2015. All Cricut Design Space cut files will be available to my subscribers, as well.
I wanted to say...CONGRATULATIONS TO CHERYL MURPHAY! She won the Sunflower Box Card kit.
For the Cricut Design Space cut file - click HERE
For the YouTube video tutorials - click for Part 1 and Part 2
Follow the Electric Poppy on Facebook ...just click!
Follow the Electric Poppy on Facebook ...just click!
Happy Crafting, Kim


Most images are from the Creepy Critters Cartridge. This can be used a card or a Halloween decoration. I added a twinkling LED tea light candle to mine and it is just darling!
Sunday, September 20, 2015
Giveaway and Finally my first tutorial ~ Sunflower Box Card
Hey Everyone,
This post has been a long time coming. I created my Sunflower box card back in July and my goal was to create a video tutorial for this particular card since then. I had purchased Pinnacle Studio 18 video editing software shortly after and have worked here and there to learn how to use this program. It was overwhelming at first but I love it to say the least. The video is a 2 part series and is a little long but I didn't want to miss any details. I would appreciate your feedback on the my tutorial. I would love for you to become a subscriber to my YouTube channel 'The Electric Poppy Creates' https://www.youtube.com/channel/UCngF9lrEBPNbcedErvNxuiQ
Giveaway...we all love a giveaway! I will pick one winner (must be a subscriber) in the next 2 weeks - you will be receiving a Sunflower Box Card Kit. All the paper elements to make this card is included. Winner will be announced 10/4/15. This contest is limited to the U.S. only...sorry. Leave a comment that are a subscriber with your e-mail address or you can e-mail me at kimberspaperdesign@hotmail.com
Happy Crafting, Kim
Cricut Design Space file (it is big so give it time to load):
https://us.cricut.com/design/#/canvas/29410507
YouTube: Sunflower Box Card Part 1:
https://www.youtube.com/watch?v=Me6QdNnp3wM
YouTube: Sunflower Box Card Part 2:
https://youtu.be/G6IBRVXSfZ0

This post has been a long time coming. I created my Sunflower box card back in July and my goal was to create a video tutorial for this particular card since then. I had purchased Pinnacle Studio 18 video editing software shortly after and have worked here and there to learn how to use this program. It was overwhelming at first but I love it to say the least. The video is a 2 part series and is a little long but I didn't want to miss any details. I would appreciate your feedback on the my tutorial. I would love for you to become a subscriber to my YouTube channel 'The Electric Poppy Creates' https://www.youtube.com/channel/UCngF9lrEBPNbcedErvNxuiQ
Giveaway...we all love a giveaway! I will pick one winner (must be a subscriber) in the next 2 weeks - you will be receiving a Sunflower Box Card Kit. All the paper elements to make this card is included. Winner will be announced 10/4/15. This contest is limited to the U.S. only...sorry. Leave a comment that are a subscriber with your e-mail address or you can e-mail me at kimberspaperdesign@hotmail.com
Happy Crafting, Kim
Cricut Design Space file (it is big so give it time to load):
https://us.cricut.com/design/#/canvas/29410507
YouTube: Sunflower Box Card Part 1:
https://www.youtube.com/watch?v=Me6QdNnp3wM
YouTube: Sunflower Box Card Part 2:
https://youtu.be/G6IBRVXSfZ0

Tuesday, August 4, 2015
Sunflower Box Card
Hi Crafters! Here is my Summer project I created for the Aldina Rose group on Facebook. Since it is now August, I thought of late Summer for inspiration. And naturally sunflowers came to mind; they are my favorite. I also gave this to my mother as her birthday card.
Please, become a follower and e-mail to this subscriber to my blog. Why...I will be sharing directions and the Cricut Design Space file I used to create this box card this upcoming weekend.
The base I created from objects in the Craft Room cartridge. All items are free or in the subscription in Cricut Design Space. Please tell me what you think. I really appreciate your comments. All pictures belong to The Electric Poppy and Kimberly Sisco. You may share but please give credit.

Please, become a follower and e-mail to this subscriber to my blog. Why...I will be sharing directions and the Cricut Design Space file I used to create this box card this upcoming weekend.
The base I created from objects in the Craft Room cartridge. All items are free or in the subscription in Cricut Design Space. Please tell me what you think. I really appreciate your comments. All pictures belong to The Electric Poppy and Kimberly Sisco. You may share but please give credit.

Tuesday, July 7, 2015
Cricut Design Space: Patriotic Flag
Hello Crafters,
I wanted to share a flag that I created in Cricut Design Space. I created this flag for the Aldina Rose Designs Facebook Inspiration Team click HERE to see all the incredible projects. I share the cut file at the end of this post. All design elements in this project are included in the Cricut Design Space subscription.


I wanted to share a flag that I created in Cricut Design Space. I created this flag for the Aldina Rose Designs Facebook Inspiration Team click HERE to see all the incredible projects. I share the cut file at the end of this post. All design elements in this project are included in the Cricut Design Space subscription.


Tuesday, June 9, 2015
Hot Air Balloon Redo
Hello Crafters! Have you ever made a project and were just not completely happy with it? Happens to me all the time. My last card was a perfect example. I was not happy with the background, the clouds, etc... It was not as I had imagined. So, I made a new card and I am much happier with the results. I added some extra clouds to create balance and heat embossing. Again, I used my Cricut Explore and Cricut Design Space to create this card. I share my Cricut Design Space link at the end of this post.
 |
| AFTER |
Sunday, May 17, 2015
CRICUT CARD: HOT AIR BALLOON & GIVEAWAY
Hello my crafty friends. It is a cloudy, rainy day here in Southwest Missouri. So what is a girl to do...get crafty. I decided to make a card I have been thinking about for a while...a hot air balloon card. I used my Cricut Explore and Cricut Design Space to help me create this little card. At the end of this post I share the link to the Cricut Design Space file for this particular card. Also, I will be giving this card away...details at the end of this post.


Saturday, November 15, 2014
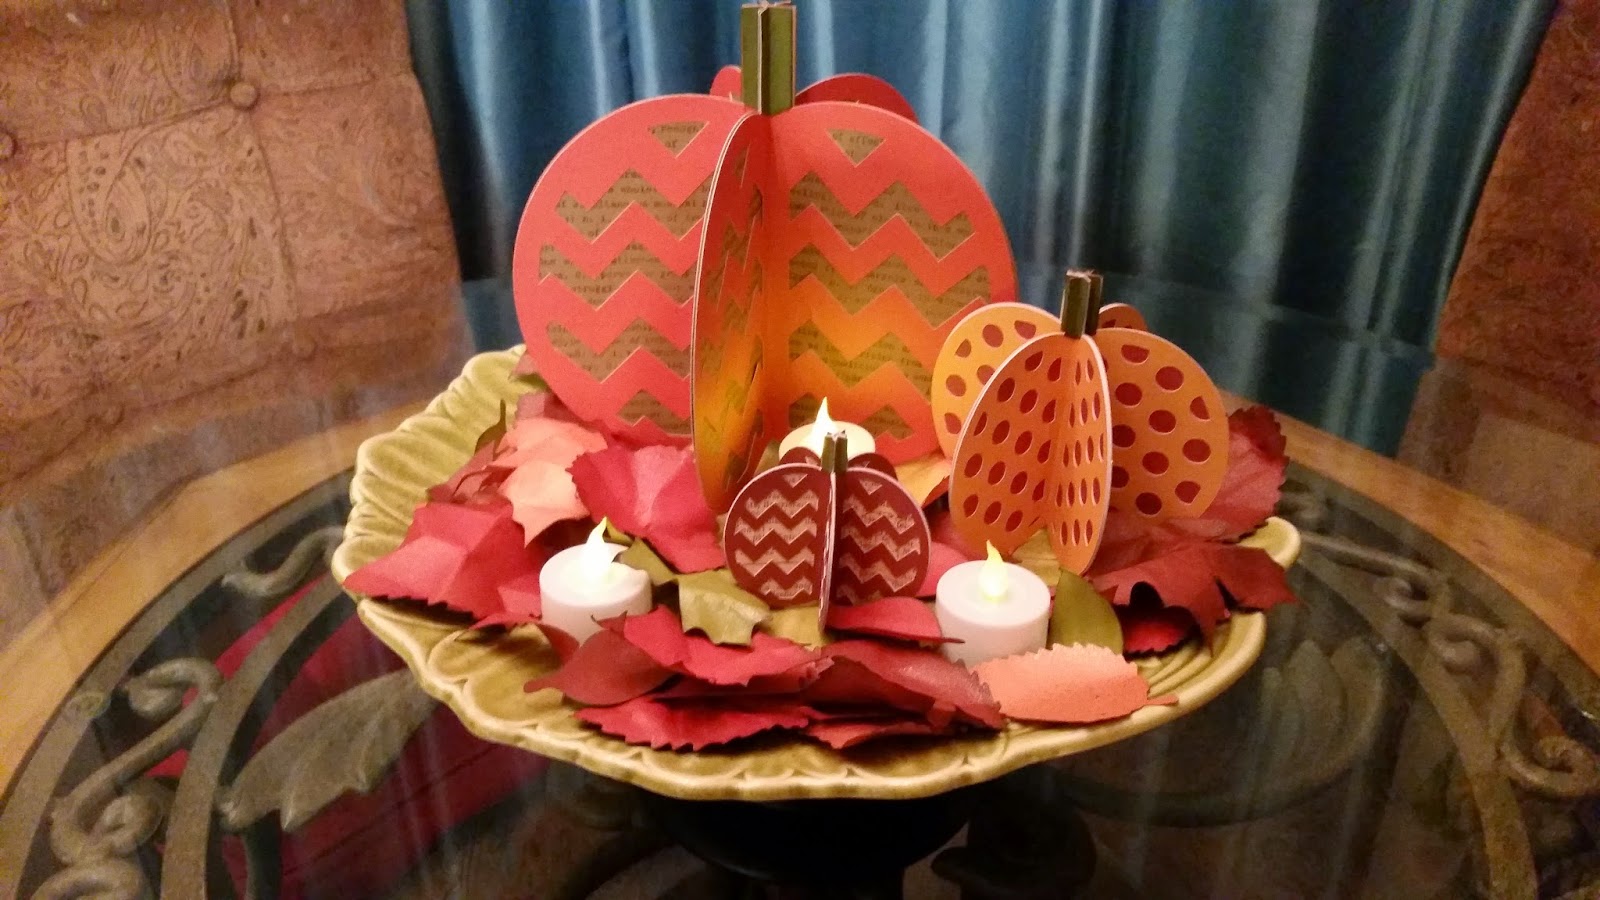
Easy Thanksgiving Decor
Hi Everyone! Thank you for stopping by. I wanted to share a project that I found in Cricut Design Space and it is free. It is also available in Cricut Craft Room.
Here is my project:
Here is my project:
Saturday, October 11, 2014
My Cricut Craft Room Blog Hop - HALLOWEEN HOME DECOR

Thank you for joining us today for the My Cricut Craft Room Blog Hop.
We are featuring Halloween Home Décor!

Sunday, September 28, 2014
Fall Fever...so let's create!
Hello Crafters! I wanted to share a wreath I made to celebrate my favorite season....FALL. I love everything about Fall. Fall has always been memorable for me because this is a time a year when my family gets together for chili dinners or just spending time together with a hot cocoa. I was inspired to create a wreath using my Cricut Explore and Cricut Design Space. I was amazed at how simple and fast this process was. I was a little ambitious and cut out 225 leaves. I had no idea how many I would need because I wanted to make a large rectangular wreath. I did not quite use all the leaves but I used most of them. So let me show you the steps to this process.


Here is the completed wreath. The bow was the most challenging for me...I have a love/hate relationship with bow but I succeeded. The ribbon is from Michaels by Celebrate It "Harvest".
I used Cricut Design Space to cut my leaves. I used the search function for leaves, leaf, Fall, and Autumn. Here are the measurements and cartridge from left to right: (green) 2.54" x 3.5", (pink) 1.81" x 2.5" I am sorry I don't know the name of the cartridge for these; (red) 'Home for the Holidays Fall/Winter' 1.118" x 2.5"; (dark red) 'Straight
From the Nest' 3.64" x 4" and (yellow) 'Straight From the Nest' 3.18" x 3.5".
This is what the leaves look like after cutting them out...BORING! So, I decided to do some inking and misting. Yes, that is 225 leaves. I used Recollections cardstock...it is a pack of Autumn colors. I was impressed how durable the cardstock is.
Before Misting.
After Misting.
I used Ranger Perfect Pearls Mist....LOVE this stuff!
A close up of how these leaves transform after a little misting is done.
After misting I decided to ink the edges and this just added more dimension to the leaves. On most I used Tim Holtz Distress Ink 'Walnut Stain'.
On the yellow maple leaves I decided to try some red ink and love how these looked.
After all the misting and inking I felt they still needed something else. So, I waded them up in my hand to create this crinkle effect. I did this with all of them except for the smallest leaf.
For my base I used a foam board by Elmer's. The board measures 16" x 20". I cut out the center leaving a 4.25" frame. I then covered the front of the foam board with kraft cardstock so that the white would not show through. Sorry, I forgot to take a picture of the foam board after it was cut.
I used a hot glue gun to apply the leaves and I layered the leaves in a counter clock wise around the foam board. I did not apply the smallest leaf (the red one in the image above) until the end. This small leaf worked great as a filler.
My welcome sign is from Lacy Labels and Measures 5.25" x 10". I used my Crop-A-Dial to punch holes in the sign and the edge of the wreath. I used raffia to hang the welcome sign.
Subscribe to:
Posts (Atom)